Saturday, August 20, 2016
Saturday, September 3, 2011
4 Practical Part

Figure 4.1 Crawler mechanical designs
4.1 Equations and analysis
The belt circumference needed in every stage of this design is variable when the planet wheels change its position as shown in figure 4.2 and 4.3, so when we need to choose the belt, we must calculate the belt length required at take care this point.

Figure 4.2 The main arm in horizontal position (minimum belt length required

Figure 4.3 The main arm in vertical position (maximum belt length required)
We choose the value of the radius of the driver wheels depending on the velocity Which we prefer to be less than (25 m/min), so we choose the speed of the motor to be 60 rpm (which is available) and the maximum velocity (25 m/min) then :

( RH : is the maximum driver wheel radius we need to have the maximum velocity )
So, we must choose RD less than (6.6314 cm) to have velocity less than 25m/min.
We choose RD = 6.25 cm .
The physical dimensions for mechanism used in experimental part of our project are shown in table 4.1 below:

Figure 4.4 Mechanical system parts

Table 4.1 Practical values for the mobile robot
Belt length can be calculated as follows:
- The minimum belt length can be calculated from figure 4.2 as:
Minimum length (Lmin) = 2 [ BE + EF + FC ] (Eq-1)
- The maximum belt length can be calculated from figure 4.3 as:
Maximum length (Lmax) = AC + CB + BE + EF + FA (Eq-2)
Where:

4.2 Calculations of the practical design
The calculations show that the length of the belt (circumference) required in the vertical position is longer than in the horizontal position.
Substituting physical values in equation 1, we obtain:
LMIN = 2 [45 + (50 - 22.5)] + (3.14 * 6.25) + (3.14 * 2.75) = 173.274 cm
And substituting in equation 2, we obtain:
LMAX = 3.14 * 6.25 + 45 + 2 * [(22.5 + 6.25) + (50 + 2.75) ]
=184.787 cm
To solve this problem we choose the length of the belt depending on the horizontal position(LMIN) and we put spring on the main arm to correct the increasing of the belt distance needed in the vertical position.

Figure 4.5 Spring position
Here we finished our project ( Tele - Operated Robot).
RESULTS AND RECOMNDATION
1- We believe that crawler mobile robot design will allow us to solve many of the problems associated with obstacles such as stairs, roughness…etc. 2- It's recommended in feature to continue and improve the software used in our project by using Image Processing or Voice Processing methods and improve the radio frequency link (RF transmitter and receiver ) by solve the noise problems and increasing the range . 3- Despite the difficulties and obstacles faced in accomplishing our project, all the group members found this to be an important learning experience from a technical point of view and cooperated to solve the problems by arrangement the tasks.
3 PIC Microcontroller & Wireless Transfer
3.6 Wireless Data Transfer
3.6.2 Transmitter (TX)

Figure 3.10 Transmitter IC

Table 3.5 Pin description for transmitter

Table 3.6 Technical Specifications for transmitter
3.6.3 ANTENNA
For 433 MHz frequency we have three type of antenna shown in Figure 3.11


Figure 3.11 The types of antenna
Sunday, August 28, 2011
3 PIC Microcontroller & Wireless Transfer
3.6 Wireless Data Transfer
We transfer the control signals in our project using wires from PC to the PIC microcontroller.
To advance the project we use the radio frequency transmitter and receiver module for a wireless control transfer signals as another options.
The Compact FM Hybrid transmitter and receiver Modules are used in this project to receiving a signal data at up to 9.67kbps of the state of the transmitter with rang up to 250 m with CMOS/TTL Compatible Output, offers low current consumption , which uses no adjustable components ,and requires No radio license to operate . The transmitter is attached to the serial port on the PC to send data on the 433.92 MHz carrier to the motion control subsystem.

Figure 3.8 Radio frequency (RF) – Receiver and Transmitter
3.6.1 Receiver (RX)

Figure 3.9 Receiver IC (RX)

Table 3.2 Pin description for Receiver

Table 3.3 Operation mode for Receiver
Technical Specifications

Table 3.4 Technical Specifications for Receiver
3 PIC Microcontroller & Wireless Transfer
3.5 Circuit Layout

Figure 3.6 PIC16F876 hardware interface connections

Figure 3.7 PIC16F876 hardware interface board
The previous figure shows the connection between the PIC microcontroller and the hardware components such as the stepper motors, D.C motors, light and so on. A crystal of 10MHz is connected to the CLKIN pin to generate the clock of the PIC. The data from the RF is received through the RA3 pin (pin5). Every one of the three D.C motors need three lines for direction and speed control(Enable,IN1,IN2) and the stepper motor needs two lines for direction control(Enable,(CW/CCW)). The output control lines of the microcontroller in this table shown below:
| RB0 | ENABLE (PWM) | |
| RB1 | IN 1 | D.C motor 1 |
| RB2 | IN2 | |
| RB3 | ENABLE (PWM) | |
| RB4 | IN1 | D.C motor 2 |
| RB5 | IN2 | |
| RB6 | ENABLE | |
| RB7 | IN1 | D.C motor 3 |
| RC0 | IN2 | |
| RC1 | ENABLE | Stepper |
| RC2 | CW\CCW | motor |
Table 3.1 Output control lines of the microcontroller
Saturday, August 27, 2011
3 PIC Microcontroller & Wireless Transfer
3.3 PC software
We used the visual basic 6 language to transmit the control signal to the serial port.
The visual basic program gives ability to control the robot by the user orders.
3.4 PIC programmer
PIC microcontroller is able to run programs written in assembly, PicC and PicBasic. You can purchase the programmer, but it is too expensive. In our project we design a new circuit as shown in figure 3.2 that is programming PIC 16F876 chip. The programmer don’t require a separate power supply, put takes the power from the serial port of a PC.
Connection with the PC is made by a cable 1-1, 9 pin connectors, male-female.

Figure 3.4 Programmers for PIC microcontroller
Programming the PIC microcontroller family can be done by changing the wires of this programmer to the same name pins of the other PIC new chip.

Figure 3.5 The programmer for PIC16f876
3 PIC Microcontroller & Wireless Transfer
3.2 Serial port interface
The transmitting signal from PC ranges from 12 Volts to –12 Volts (RS level) which is not compatible with the PIC microcontroller or with the RF transmitter which required a voltage setting of +5 Volts to 0 Volts (TTL level), so we must put max232 as a level shifter between RS level and TTL level .

Figure 3.2 MAX232 IC connections
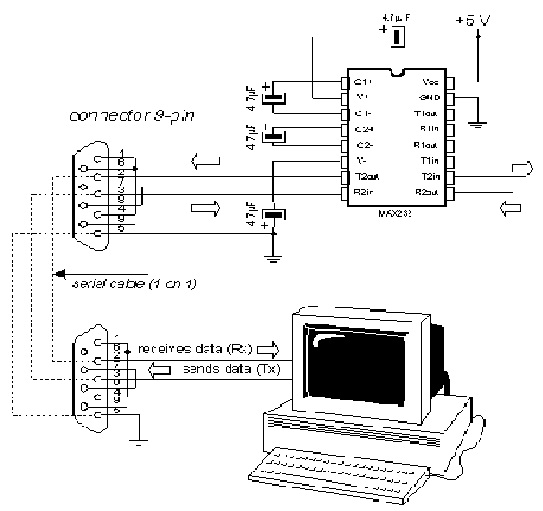
Figure 3.3 Connection between serial port in PC and MAX232 IC
Subscribe to:
Comments (Atom)